
Recent Posts
-
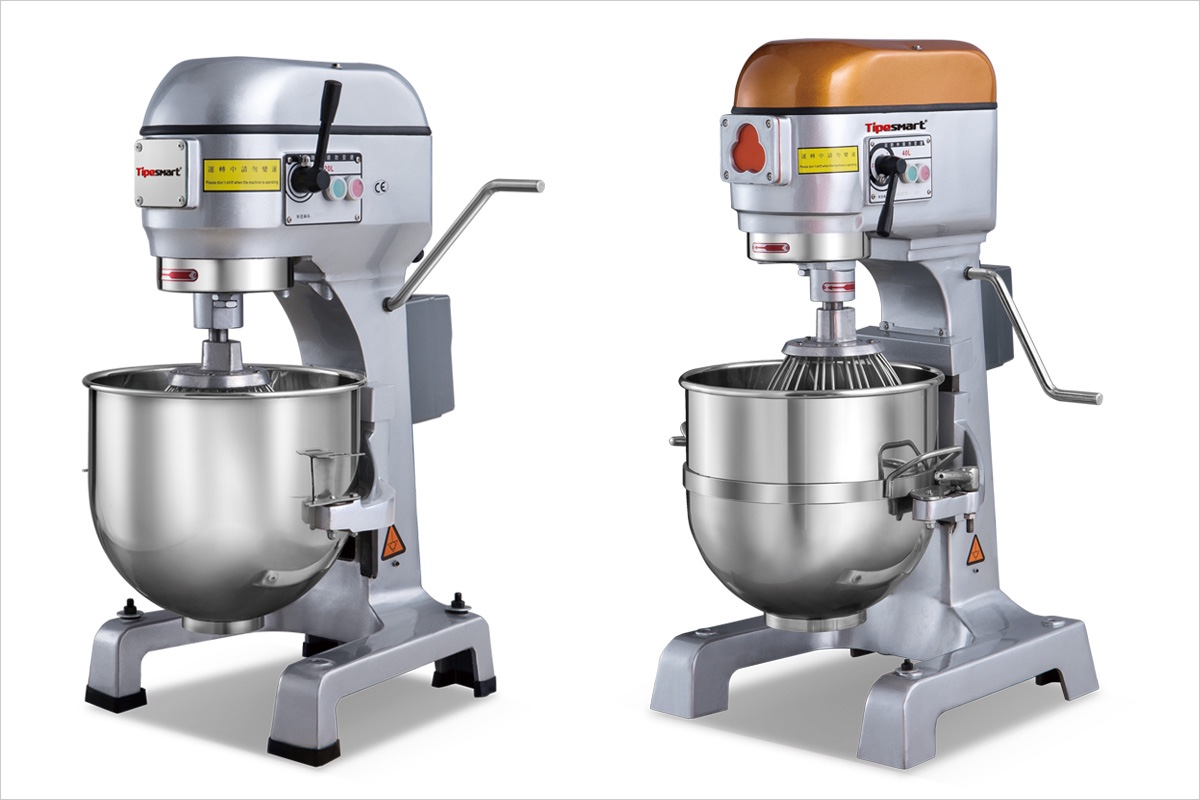
![The planetary mixer is one of the most used Bakery Equipment]() The planetary mixer is one of the most used Bakery Equipment
The planetary mixer is one of the most used Bakery EquipmentThe planetary mixer is one of the most popular tools in the industry and factory specific processes and finds its applications in food manufacturing plant, bakeries, medical drugs manufacturing units and even the construction material manufacturing units. This post will comprise the details and advantages of a Bakery Planetary Mixer. Let us begin with a small introduction to the Planetary Mixer Machine used in the bakeries. What is a Bakery Planetary Mixer? The Planetary Mixers are also called as the cake mixers, cream mixers or the dough mixers. Its unique nature of motion around its own axis and throughout the circumference of the utensil in which the dough and baking ingredients are there; gives it the name - Planetary Mixer Machine. Its movements resemble the movements of the planets. The Planetary Mixer Machine is highly versatile and is thus one of the most used machines in small bakeries and patisseries. Another unique feature of the Bakery Planetary Mixer is that it comes with interchangeable utensils that can be used for different purposes. Some examples are dough hook, whisk and mixing paddle Advantages of using a Bakery Planetary Mixer All the baked goodies need better and accurate mixing. Better mixing means better taste, better fluff and better raw material utilization. The planetary mixers ensure the best possible mixing of the ingredients and thus the goodies prepared with it are the best ones. Read on to find out more about the advantages of the Tipesmart Planetary Mixer Machine.
08/08/2022
-
![How to Choose the Right Commercial Mixer]() How to Choose the Right Commercial Mixer
How to Choose the Right Commercial MixerBefore making your purchase, there are three main questions you will want to ask yourself: 1.) What will you be mixing? Different types of dough and batter will have different consistencies, and as a result not every mixer is right for every job - kneading a batch of thick, stiff dough is going to require more power than mixing meringue or icing, for example. A commercial bread mixer and pizza dough mixer will be different than a mixer meant for whipping delicate egg whites. Finding the absorption ratio (Liter of water divided by Liter of flour) for some of your most commonly used dough is a good way to figure out what types of mixers might best suit your needs; the lower the absorption rate, the more difficult the dough will be to mix and in turn, the more powerful your unit should probably be. 2.) What type of usage do you expect from your mixer? All mixers are designed to handle the rigors of commercial use, but some are better equipped for certain types of mixing than others; be sure to check the manufacturer's literature on the product pages for more information. 3.) How much will you be mixing? How much you will be mixing plays a large role in what size of mixer you will want to look at. A small restaurant can take care of most needs with a 5 - 20 qt. planetary mixer. In contrast, a pizzeria or bakery will want to look at 40 qt. or larger, or even a spiral mixer in very large-scale applications. This is because the mixer is being used almost constantly and turning out high volumes of product. Also, be mindful of the fact that the bowl can't be filled to the brim and different ingredient factors will affect how big each batch can be: Higher flour protein content = smaller batch size Lower water temperature = smaller batch size Less water in the dough = smaller batch size Higher mixing speed = smaller batch size More oil / shortening in the dough = smaller batch size
08/08/2022
-
![What are the standard safety features of a commercial mixer?]() What are the standard safety features of a commercial mixer?
What are the standard safety features of a commercial mixer?Unguarded food preparation mixing machines in commercial kitchens can cause serious injuries, including amputations and broken bones. This page can help employers to control the risks to employees using, cleaning, and maintaining food preparation mixers. Food preparation mixers can cause serious injuries Rotating attachments on unguarded food preparation mixers are a health and safety hazard in commercial kitchens. Workers reaching into the bowl to remove a product, clean or add extra ingredients during the mixing process risk being caught in the rotating parts of an unguarded mixer. Food preparation mixers can cause serious injuries, including amputations, fractures, cuts, and de-gloving. De-gloving is where the top layers of skin and tissue are torn from the underlying muscle, connective tissue, or bone. Reduce the risks If it is not reasonably practicable to eliminate the risks associated with the plant, an employer must reduce the risks, so far as is reasonably practicable. Engineering controls such as guards and administrative controls such as instruction, training, and supervision can help reduce the risks from food preparation mixers. Use interlocked guards Food preparation mixers should have guards to prevent rotating parts from causing injury. The most effective guard is a purpose-built interlocked guard. An interlocked guard is a physical barrier linked to the power or control system of a machine. The interlock may be mechanical or electrical. The guard can be clear polycarbonate or mesh. There should be two interlocks on a food preparation mixer. One interlock confirms the guard is in place, the other confirms the mixing bowl is in position. The machine should not work if either interlock is not set. The interlocked guard should: prevent access to moving parts prevent the machine from operating unless the guard is in place stop all moving parts once the guard is lifted stop the mixer if the interlock switch fails be solidly constructed and securely mounted be designed so it cannot be bypassed or disabled provide a chute if procedures require batch adding without stopping the mixer not create a risk of injury from maintenance and cleaning Training and supervision Employers
08/08/2022
-
![Bread Proofing Box Functions]() Bread Proofing Box Functions
Bread Proofing Box FunctionsMost bread proofing boxes are just that—a simple box in which you place your dough for the final rise. However, some bread proofing boxes, particularly the electric versions, have additional functions to make your life easier: Timer A timer is very handy for making sure that your dough is not left to rise for too long! The timer may be an alarm that tells you to remove your dough, or it may be able to turn off the heat source. Temperature Source & Control The premium versions of bread proofing boxes come with an integrated heat source. These will give you the best possible results when proving your dough, as nothing is left to chance. If you have a bread proofing box without a heat source, you will need to provide one. Options include a heat mat or an oven on the lowest temperature setting. You may also be able to utilize one of your other kitchen gadgets, such as a slow cooker or food warmer. Some bread proofing boxes come with temperature control, perfect for keeping your little yeasty friends warm and thriving. Yeasts are very fussy and will not like being too warm or too cold! Ideally, the heat source should be thermostatically controlled, so it turns off when the optimum temperature is reached. If not, or if you are using an external heat source, it can be useful to place a thermometer somewhere visible inside your proofing box. Humidity Control The air within a bread proofing box must be humid to prevent a skin from forming on the dough. This skin will hinder the ability of the bread to rise, and also result in a thick crust on your baked loaf. Some bread proofing boxes can add humidity to the air, normally through a water reservoir. Alternatively, you can stand a small cup of boiling water inside the proofing box to give a continuous supply of steam. Viewing Window A viewing window is pretty much essential when selecting a bread proofing box. Even if you have a thermostatically controlled heat source and a timer, you will still need to keep an eye on what your bread is up to! Yeasts can behave in all sorts of weird and wonderful ways, and you may find your dough takes a lot more or less time to rise than you expected.
08/08/2022
-
![Can You Leave Bread Dough To Rise Overnight?]() Can You Leave Bread Dough To Rise Overnight?
Can You Leave Bread Dough To Rise Overnight?There’s a time in every bread baker’s life where you end up making bread dough later in the day than you expected, so it’s getting too late to bake the dough. When this happens, you have the option to stay up late and bake it when it’s ready, bake it whilst it’s underproofed (a big no-no), or leave it out and hope for the best in the morning. None of these are particularly appealing, but leaving it out overnight sounds the best as you’ll be able to bake it in the morning and have fresh bread for a late breakfast or lunch. Bread dough can be left to rise overnight if it’s stored in the refrigerator. Storing dough in the refrigerator can slow the rise for 8-48 hours or longer, depending on the dough. Some dough can be left out at room temperature overnight, but this often leads to overfermentation. This means that you might wake up to fully proofed dough that’s ready for baking. I don’t know if there’s anything better than the smell of freshly baked bread on a morning. If you don’t have enough space for your dough in your refrigerator, you might not have to worry as I’m going to discuss alternative ways to store your dough later in this article. Why Refrigerating Your Dough Is Important The most important reason that you want to refrigerate (retard) your dough is so you can prevent it from turning into a flat and overfermented mess. When the dough overferments, or overproofs, it means that either the yeast has completely run out of their food (sugars and starches in the dough) or the dough has risen too much and collapsed. The idea behind refrigerating the dough is that it can slow the activity of the yeast dramatically, which in turn slows their ability to consume their food and produce more gas. If you were to leave the dough out overnight, it is almost certain to overferment, but this is significantly less likely to happen if it’s stored in the fridge. An added bonus to this extra-long rising time is that the flavors can develop much more. The longer the dough rises and the longer the yeast gets to do their work, the better the bread is going to taste. This is because the yeast can break down the large molecules in the dough into smaller molecules that are more complex and flavorsome, which makes it even more pleasant to eat. The final reason to store your dough in the fridge is if it’s enriched. Dough containing anything that can spoil easily, like eggs and milk, will easily go bad if left out for too long. You want to minimize the risk of the ingredients in the dough going bad, so you need to store it in the fridge. Leaving the dough out for too long will invite too much bacteria and can leave you with bread that may be unsafe to eat. Another thing to consider is if your dough contains sugar. The sugar is going to feed the yeast, which causes it to produce gas more quickly and therefore overproofs faster.
08/08/2022
-
![How to use your gas oven for baking cakes]() How to use your gas oven for baking cakes
How to use your gas oven for baking cakesBaking using a gas oven is different from an electric oven since gas ovens heat up quickly and sporadically causing uneven heat distribution. It takes practice to bake properly on a gas oven. For gas ovens, the main burner is at the bottom of the compartment. Some ovens may have a second burner at the roof of the oven compartment often used for broiling. Follow these steps when baking cakes with a gas oven: Turn on the knob to maximum and light the gas with a lighter or a match stick. To light a gas oven, locate the pilot light that is often located at the bottom of the oven. When a blue light turns on, the oven is now ready to be used. If you are baking in more than one tin or tray, make it a point to rotate once or twice during your cooking. Rotate 90 degrees halfway during cooking. This will help eliminate the chances of hot spots on one side of the cake. Avoid putting your cake at the bottom rack so that it doesn’t burn. The upper rack is preferred to avoid burning the bottom of your cake. Test it with a toothpick to see if it comes out clean. Remember when using the gas oven, it may take longer for the cake to bake all the way through and not just the bottom and the sides. If it is not done through, slightly lower the temperature by about 15 degrees and allow for an extra 10-15 minutes of your baking time. When ready, take out the cake, shut the oven door, and shut it off. You can choose to use a separate oven thermometer to gauge the temperature and place a pizza stone on the bottom rack. This reduces the heat spikes that might occur with gas ovens.
08/08/2022
-
![Convection Oven Benefits]() Convection Oven Benefits
Convection Oven BenefitsThe major benefit of convection ovens, when compared to a standard radiant oven, is their ability to reduce cooking time by up to 25% and cooking temperature up to 30%. These units are so versatile that they can be used to cook, warm, roast, re-thermalize, and bake. Convection ovens work so efficiently because they're equipped with fan technology that actively circulates the hot air in the oven around the food, creating a uniformly even temperature and cooking every surface with equal heat. Standard radiant ovens let air move around the food at random, which creates hot and cold spots, resulting in burnt and undercooked parts of the food. This system of moving air and equal heat also helps to ensure that the bottom of food doesn't get burnt to a crisp while the top is left nearly raw, a frequent occurrence with many regular ovens. You can cook everything in a convection oven that you can cook in a standard radiant oven; oftentimes, items cooked in a convection oven are much tastier, crispier, and juicier. Since the cooking time and temperature are less, the butter and flour in a pie crust and other delicate bakery goods won't have time to fuse, creating flaky layers. Ultimately, you can use convection ovens for baking, roasting, browning, and rethermalizing. The skin of a roasting chicken renders it's fat and browns more quickly, so the meat cooks faster and stays juicier. Meats also have a higher yield, which means it shrinks less, leaving more product for you to sell. Saving time and money will help your food service establishment be more profitable.
08/08/2022
-
![Types of Commercial Ovens]() Types of Commercial Ovens
Types of Commercial OvensStandard Ovens: These ovens are the simplest kind of commercial ovens. Also known as "radiant ovens," a standard oven features a heating element in the bottom of the unit that transmits heat into the body of the oven. Standard ovens can be used to cook almost any recipe that requires the use of an oven. Additionally, they are generally the least expensive type of oven and are usually the easiest to repair. However, because of the inconsistent nature of radiant heat, standard ovens have a tendency to cook food slowly and sometimes unevenly if the oven temperature is not set high enough. Convection Ovens: Convection ovens are very similar to standard ovens, aside from one major difference: air circulation. Convection ovens include fans within the body of the appliance that circulate the warm air through the oven. This air circulation allows food to be cooked faster (higher air velocity promotes faster heat transfer), more consistently, and at a lower temperature than is required from standard ovens. Circulating the air also prevents the formation of hot or cold spots in the oven, ensuring a more consistent cooking temperature and producing more evenly cooked food. Because of their reliability and versatility, convection ovens have become the standard in most commercial kitchens.
08/08/2022
-
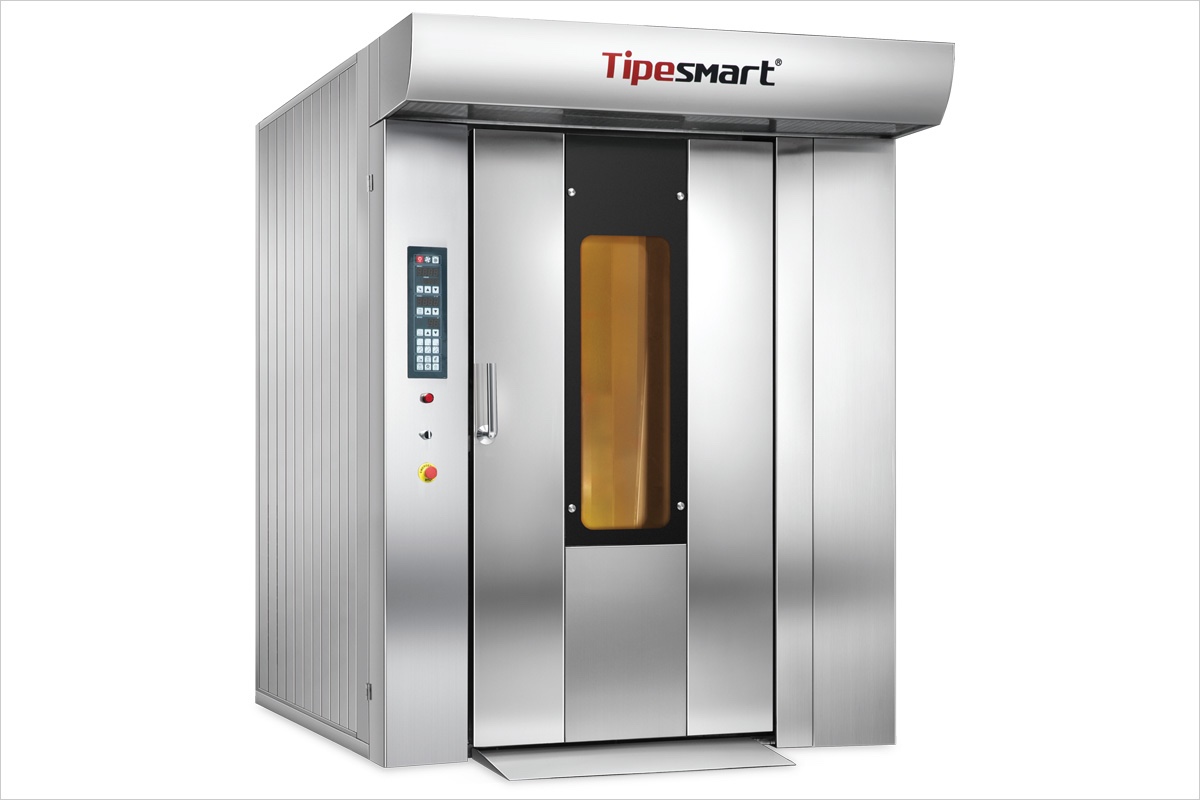
![What are rotary ovens used for?]() What are rotary ovens used for?
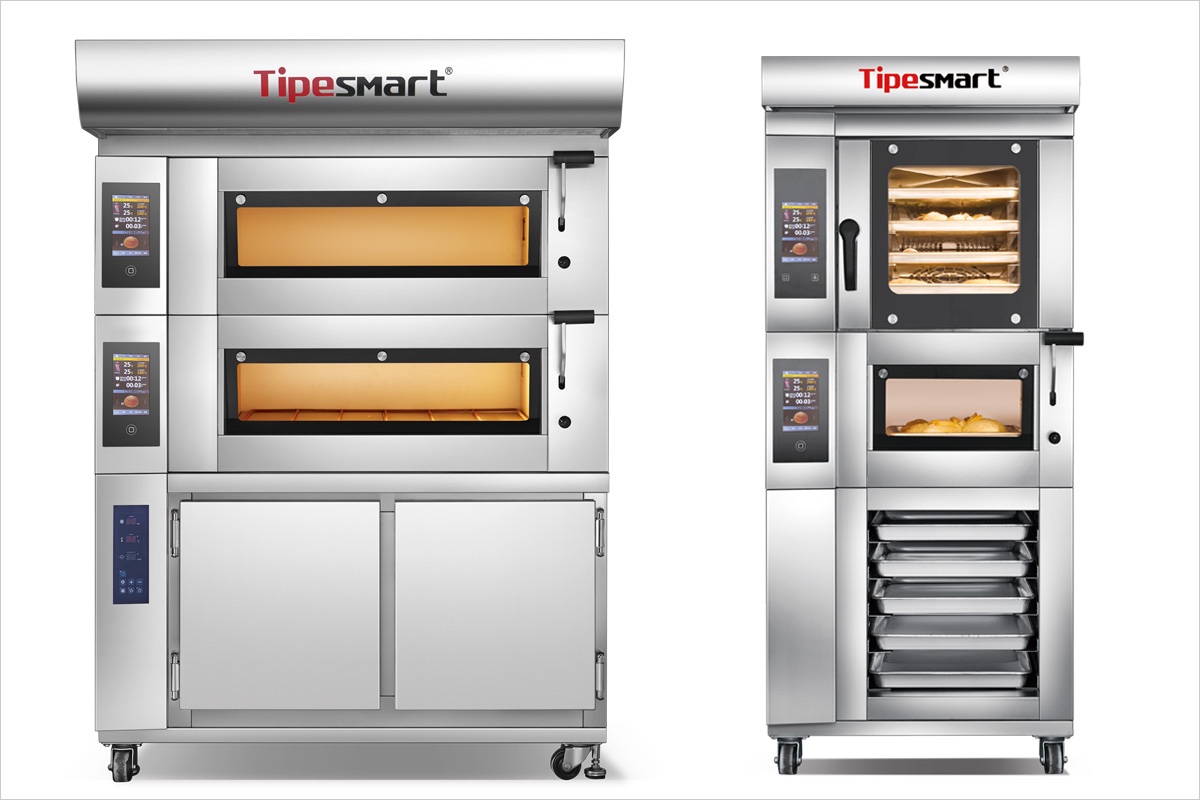
What are rotary ovens used for?The rotary oven is bakery equipment designed especially for bakeries that want productivity, quality product, homogeneous baking characteristic, and more energy saving. The Control panel can be a touchscreen or manual. Tipesmart Rotary Oven is a highly efficient oven built for heavy-duty production, while offering perfect baking results and energy efficieny. It is ideal for large bakeries, supermarkets, food factorie and hotels. Newly upgraded speed-control offers 5 different speeds for your choice, you can bake any French pastries with easy control Unique fresh air management to reach great crispiness Powerful steam system with adjustable time and strength Turning platform for better operation safety Key components from European suppliers to ensure stability Advanced Touchscreen PCB control for the best user-experience you may imagine
08/08/2022
-
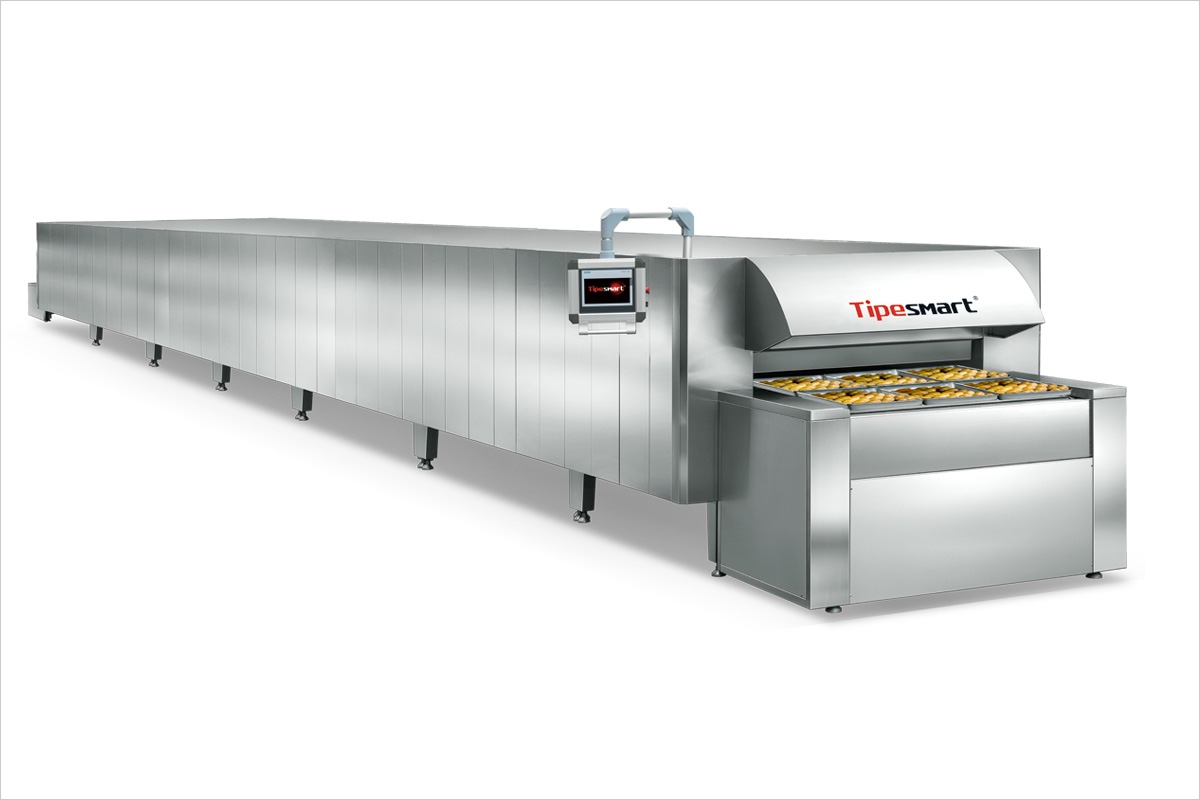
![How does the tunnel oven work?]() How does the tunnel oven work?
How does the tunnel oven work?It heats the oil to the necessary temperature and circulates it through the pipes around the oven room. This will produce mild radiant heat, which is evenly balanced over the entire width of the oven without turbulent air movement. Tunnel ovens use different conveyor speeds to allow different cooking or baking times. Tunnel furnaces are continuous rather than using intermittent processes. It can be used to make bread, pies, cakes, cooked meat, and many other items. The product passes through the oven on the conveyor. They have a long conveyor belt that passes the dough through a heated box oven. The length of the oven is usually between 25 meters and 100 meters. The conveyor belt is made of steel mesh or carbon steel plate and rotates around a large cylinder at each end of the tunnel furnace. The conveyor is driven by a variable speed drive at the end of the tunnel oven, allowing the operator to adjust the baking time. Temperature and humidity control is divided into several areas along the length of the tunnel oven, and each control area is usually between 8 meters and 20 meters long. In this way, the temperature and humidity can be set and controlled throughout the baking process to optimize the conditions for the formation of biscuit structure, moisture content, and color when the dough moves in the oven. The extraction system in each area controls the humidity of the baking room and removes moisture from the dough. This includes ducts that draw air and moisture from the baking room through fans and discharge air into the atmosphere through vertical flues (chimneys). Different times can be set for making different foods. Slowly by heating, you can make delicious cakes, bread, pies, cooked meat, and other delicious food.
08/08/2022


How to use your gas oven for baking cakes
Baking using a gas oven is different from an electric oven since gas ovens heat up quickly and sporadically causing uneven heat distribution. It takes practice to bake properly on a gas oven.
For gas ovens, the main burner is at the bottom of the compartment. Some ovens may have a second burner at the roof of the oven compartment often used for broiling.
Follow these steps when baking cakes with a gas oven:
Turn on the knob to maximum and light the gas with a lighter or a match stick. To light a gas oven, locate the pilot light that is often located at the bottom of the oven. When a blue light turns on, the oven is now ready to be used.
If you are baking in more than one tin or tray, make it a point to rotate once or twice during your cooking. Rotate 90 degrees halfway during cooking. This will help eliminate the chances of hot spots on one side of the cake.
Avoid putting your cake at the bottom rack so that it doesn’t burn. The upper rack is preferred to avoid burning the bottom of your cake.
Test it with a toothpick to see if it comes out clean.
Remember when using the gas oven, it may take longer for the cake to bake all the way through and not just the bottom and the sides.
If it is not done through, slightly lower the temperature by about 15 degrees and allow for an extra 10-15 minutes of your baking time.
When ready, take out the cake, shut the oven door, and shut it off.
You can choose to use a separate oven thermometer to gauge the temperature and place a pizza stone on the bottom rack. This reduces the heat spikes that might occur with gas ovens.